Saturday, April 27, 2013

More Got Sketch Fun!

A few weeks ago amid the craziness of changing jobs (see previous post), Valerie from Got Sketch asked me to contribute another layout to the Got Sketch blog.  So of course I said yes.  I am a huge fan of her sketches and this one was just so much fun to work with. 
 
The sketch actually went live last Monday, but with starting my new job and getting a cold at the same time, I just didn't have the time or energy to get my layouts on the blog. 
 
Here's the blog post with the sketch as well as all of the designers' interpretations: http://gotsketch.blogspot.com/2013/04/sketch-155.html
 
As soon as I saw the sketch, I knew I wanted to use it for a Disney layout. The 3 circles in the upper right corner reminded me of the shape of Mickey's head so I went off in search of the perfect Disney photo.  I found this awesome picture of my friend Debbie and I last November when we went to Disney for Christmas. 

 
I used a mixture of patterned papers from various companies: EK Success, Fancy Pants, BoBunny, and Queen and Company but I love the effect of all the different patterns and colors.  The Mickey head was cut out on my Silhouette Cameo.  And some fun Ali Edwards stamps complete the page. :)
 
After I completed the Disney layout, I  had one last picture from my sister's wedding ceremony to scrapbook and it was also perfect for this sketch, so I decided to use it again. Love how versatile it is...from fun and vacation layouts to elegant and wedding type layouts!
 
 
This layout was perfect to use up some of the 6x6 papers I have from this beautiful collection from Basic Grey. It was also a fantastic place to showcase this fun organza flower from Jolee's that I picked up on clearance. :)
 
Well I hope you all enjoyed my layouts and I'll be back later to share more!

Saturday, April 20, 2013

Change

Lots of stuff going on here in my little world over the past few weeks. Some sad and others oh so very good. Firstly, my local Archiver's store closed last Sunday. It has been a very emotional and busy time for me, since Archiver's has also been my job for the past 3 1/2 years as well as my scrapbook store and source of information and scrapbook goodies for many years. I have learned so much about this amazing hobby and have grown as a scrapbooker and as a carmaker in so many ways. I have also made some amazing friends, including Peggy, Robin, Pam, Jennifer, Heather, Wenona, and so many others. I have been able to come together with these ladies and share my love for papercrafting with them and also be inspired by them. The past few weeks have been filled with reminiscing and making new memories towels us remember the times we have spent at Archiver's. Today was my last day there and although I am sad to see it end, I know that God has bigger and better plans for me.

As I close out this chapter in my life, God has opened up another, unexpected opportunity for me to get back into the classroom and use the talents and training that He has given me. About the same time that I found out that the store was closing, I filled out an application and had an interview for a teaching assistant position at a local Montessori school. I knew it might be a long shot since I have no training or experience in the Montessori schools, but at my interview the directors and I hit it off really well. So this past Thursday they offered me a job as a teaching assistant in their lower elementary classroom. It is working with students in grades 1-3 and I start on Monday. They also want to train me as a montessori teacher in a year or two which is so exciting!

It is just so amazing those God at work through all of this. His timing is so incredibly perfect and this new job seems to be a perfect fit for me, my talents, and my passions. I have been waiting and praying for the right job to come along and for God to show me where He wanted me to be. Lately I had become so discouraged with teaching and I was beginning to wonder if this was really where God wanted me. I started looking for other job opportunities outside of teaching and tried to wrap my head around the idea that I wasn't going to be a teacher. I clearly remember having a conversation with a dear friend about 2 months ago. I was just feeling so discouraged and lost about my career path. I didn't know what to do and I just felt like everything was such a mess. My friend sat down and prayed with me after church and her prayer was that God would bring me a position out of the blue, something I wasn't expecting but that was the perfect fit for me. And this job is exactly that. I wasn't really even looking for it but now in about 3 days I will be back in the classroom full time, able to share my knowledge with students and guide them as they grow and learn.

This has been such a long journey for me and there are so many family and friends that have been praying for me throughout this entire journey. I want to take the time and thank you all for your love, support and encouragement to me through this long, difficult process. I want to leave you with some verses that have been so important to me throughout this time and maybe they can be an encouragement to you too.

"For I know the plans I have for you," declares the Lord, "plans to prosper you and not to harm you, to give you a hope and a future. Then you will call on me and come and pray to me, and I will listen to you. You will seek me and find me when you seek me with all of your heart." -Jeremiah 29:11-13

Wednesday, February 27, 2013

Got Sketch

I am a huge fan of scrapbook sketches.  They are a fabulous way to jumpstart a layout because most of the design work foundation is already laid out for me.  I just plug in photos, papers and embellishments, and a dash of my own creativity and I end up with gorgeous layouts. 

For the longest time, my absolute favorite go-to sketches have been the Got Sketch sketches from the amazingly talented Valerie Salmon.  Aside from the sketches she releases on her blog, she also has these amazing classes that are chock full of sketches, inspiration, tips, and tricks that are the source of so many of my layouts.  I have taken all of Val's classes, or "the whole enchilada" as us Got Sketchers like to call ourselves.  To check out the blog and Val's classes, check out the blinkies on my sidebar.  :)

So when Val emailed me last week and asked me to contribute a layout to the blog, I was so excited!  Today the blog post went live so I can share the sketch and my layouts....yes two! I was so inspired I actually created 2 layouts for the sketch, but I only submitted the blue one.  :)

To see Val's sketch, go here.

Here's my first take on the sketch.  This is the layout that Val featured in her blog post.  These fun pictures of my friends and I were taken when we went to see The Hobbit back in December, hence the funny 3-D glasses. :)


I used some of the My Mind's Eye Indie Chic collection and stamps from Ali Edwards and Hero Arts to create my fun layout. The title was cut with my Silhouette Cameo. A few brads and punches finish off the layout.

Next up is my second take on the sketch.  These pictures are from Valentine's Day 2011. The sketch was perfect to display these fun photos of my parents and I opening our Valentines.

 
This is a fairly old collection from Bo Bunny called Sweetie Pie. I loved the added green in the papers to coordinate with my dad's shirt.  The heart was diecut out of some Creative Imaginations dotted felt and a stamp from Ali Edwards created the caption with the photos.
 
I loved playing along with Val's sketch and if you love sketches as much as I do, head over to Got Sketch and check it out! :)

Tuesday, February 26, 2013

A Few New Things....

Hello there my blog readers. I just wanted to pop in here on my blog and share a few new things with you all. :)

First up....if you look over there to the right ----------> you will notice a new blinkie on my page. If you click on that it will take you over to "my place" over on Scrapbook.com. I post all of my layouts over there so you can come on over and check out my work as well as sb.com's amazing site.  They have awesome galleries, formus where you can meet the nicest scrapbookers and papercrafters around, a fabulous online store where you can buy just about anything, and awesome resources to share with us who love this amazing hobby! :)

Next. I want to share a new layout I made a few days ago. 


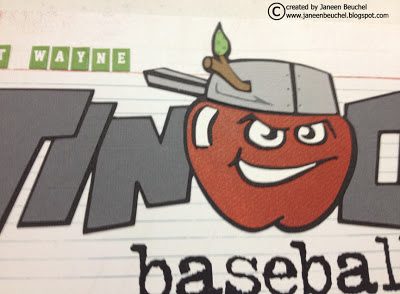
These pictures are from our first visit as a family to the new Tincaps Stadium in downtown Fort Wayne. We had just gotten a brand new stadium and a new team so I really wanted to do something cool with the team's logo on my layout.  So I turned to my favorite scrapbooking tool, my Silhouette Cameo.  I downloaded the image of the team's logo from the internet into my Silhouette software and used the trace feature to make my own custom diecut for my layout. 


I love the large graphic look that this title gives to my page and it adds a personalized element to help me tell my story.  :)
 
 
I used a combination of cardstock and patterned papers to give my diecut some dimension and texture.  I also combined my diecut title with sticker letters from Jillibean Soup's Gameday Chili collection and also some old Making Memories rub-ons to create my custom title. 
 
If you are a Fort Wayne Tincaps fan and want the cut files for the Silhouette, just shoot me a message and let me know... :)

 
To add to the baseball theme of the layout, I hand-stitched the baseball border using a Silhouette diecut as a template. 
 
 
I also found this really old denim pocket from Making Memories in my stash and it was the perfect place to house my memorabilia: tickets and the schedule of games from the inagural season of the Tincaps. 
 
 
And a fun fact...the team is named the Tincaps because Fort Wayne is the burial place of Johnny Appleseed who, as folklore tells us, wore a tin pot on his head.  :)
 
And in a few days, I will be able to share more fun scrapping goodness on my blog...stay tuned! :)


Friday, February 8, 2013

My Creative Space

Anyone who knows me knows that I LOVE to be creative.  Whether it be scrapbooking, stamping, photography, or other crafty venture, I love to make beautiful things. And the place that I do most of my creating is in my scrap room in our basement.  I have taken over the space and today I thought I would share it with you my blog readers. :)

 This is what my space looks like...nothing fancy but it is very scrapper friendly.  I love to escape down here and immerse myself in my projects.
 
The pink bins at the bottom here hold all of my punches and fabric supplies. 
 
This is my huge shelving system. Most of my stuff is organized on these shelves.  They are from Closet Maid and are perfect for holding 12x12 albums and papers. I did add extra reinforcement to each shelf because the papers and albums can get really heavy really fast. 
 
The following photos detail the shelves and what is on them...going from left to right.

This section of shelves holds lots of embellishments. The top shelf holds my newest albums and this really cool cookbook holder holds some of my most recent pages that need to be put into albums.
 
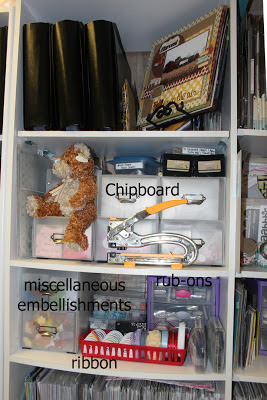
The next shelf down is almost all chipboard. The little drawers are from Cropper Hopper and hold their 4x6 photo sleeves that hold so much more than photos. I have tons of them for everything from chipboard and journaling spots to gemstones and tags.
 
The shelf below that holds more miscellaneous embellishments. The little containers in the middle hold all of my brads and eyelets, and the purple bins on the right hold my rub-ons.  The red basket in the front holds my rolled ribbons. Other ribbons are stored on embroidery floss cards in a plastic box on a shelf to the left of these shelves. Below that is all patterned paper.

This is the center part of my shelving unit. The shelves here are longer to accomodate my Paper Sticker Binders (see below). The top shelf holds more chipboard as well as buttons and other miscellaneous embellishments.  The bear is a Build-A-Bear Scrapbook Bear that I got a few years ago...love him! (But I heard that they don't make the scrapbooking outfit anymore...)
 
The next shelf holds my letter stickers in a divided embellishment box from Cropper Hopper, flowers in jars from Making Memories and the purple drawers hold miscellaneous twine and flowers.
 
Below that is my stamping supplies. The inks and embossing powders are all aranged in these drawers. Love me my inks! :)

All of my paper is organized in these 12x12 paper holders from Cropper Hopper. These babies hold over 200 pieces of paper apiece.   I have my paper organized in a few different ways which seems to work for me to be able to find what I am looking for.  My patterned paper is organized into holidays (Christmas, Winter, Beach, etc) or by manufacturer (BoBunny, Basic Grey, My Mind's Eye, etc) and I also have a few miscellaneous ones as well.  I found these great little labels on clearance at Michaels several years ago and bought out everything the store have...love them!
 
Cardstock is also organized in these paper holders.  I have a pretty meticulous system for organization...its a bit of OCD coming out in me. I only use Bazzill cardstock so I keep a current list of all of their colors in my computer. I then organize my paper based on that list starting with the reds/pinks, and moving through the rainbow order. I store my papers in plastic Cropper Hopper sleeves, 2 colors per sleeve.  The full sheets and all scraps of that color are stored here.  I also created color rings with a swatch of each Bazzill color so that I can perfectly match my patterned papers to the cardstock I want and then easily find it in my stash. Crazy right? But it works and I love it!
 
Most of my stickers and flat embellishments are stored in Paper-Sticker Binders from Crop in Style.  These binders have 12x12 page inserts. Some are divided to store smaller embellishments .  I actually have 4 of these....the other one sits on a small table to the side of my shelves.  My goal is to get down to 3 eventually...I hope.  The binders are divided into themes such as baby, beach, kids, Christmas, fall, etc... The binders are on pull out shelves so that I can easily pull them out, look through the binder to see what I want and then push it back in out of the way. My dad altered the shelves so that I could have this feature and I love it!

This section of my shelf holds lots of different things.  The top shelf holds extra page protectors, page holders and other kits that I have gathered over the years.  The album holds unifinished pages that I made at convention classes, etc. The blue bin holds all of my journaling spots and other miscellaneous journaling embellishments.  The box above that is the box I use when I use spray adhesive on my diecut shapes.
 
The next shelf down holds all of my manual die-cutting supplies including all of my Quickutz dies, embossing folders and steel-rule dies.  The pink bin holds all of my spray mists and behind that is miscellaneous stuff including my 6x6 pads, some 8x8 paper and other embellishments.
 
The shelf below that holds all of my Thickers. I have them in 2 Rubbermaid boxes but because I am a Thickers addict, there are more piled on top of the bins that don't fit.  Next to those is my decorative strips from Doodlebug and Bazzill. The Doodlebug ones are sorted into silverware containers from Bed Bath and Beyond.

 This is my stamp corner. Almost all of my stamps are stored here. All of my clear and cling stamps are stored on this Clip-It-Up Mini with the attached upper section.  I put the stamps into these bags from Office Depot, cut in half.
The stamp shelves are from Cropper Hopper and are great for holding wood mounted stamps..I also have 3 more of these on the other side of the spinner. 
 
Below this shelf is miscellaneous storage including idea books, photo supplies, and my Copic markers.
 
This is my computer desk...pardon the mess. It's kind of a catch all for the miscellaneous stuff in my scraproom.  Above my computer is where my Silhouette Cameo is. And on the little shelf next to it is more of my wood block stamps....did I mention that I love stamps?!? My printer is also located here...its an Epson Artisan 837 printer...the print quality is amazing and it is wireless which I love.

 
And finally, this is my scrap desk. This is where I do all of my creating.  It is a giant executive desk that we got free from my Dad's work when they remodeled.  There is actually another one behind it that holds my sewing machine, another Clip-It-Up with miscellaneous embellishments on it, markers,and my Cricut.
 

Back to the desk itself.  My trusty scrapbook sketch binder is always on the left. In front of me are all of my Scarlet Lime kits that I haven't yet used up.  Right now since I am working on my sister's wedding album and using the same papers throughout, those papers are also stored here.  The right side of the desk holds my most used supplies (adhesive, tools, etc).
 
Inside the desk drawers, hold extra adhesive, alcohol inking and other inking supplies, glitter, paint, circle punches, and other miscellaneous embellishments.
 
I also have a 6 foot white table that I use for extra space while I am working, or to have friends come over and scrap. 
 
 
Well there you have it....a thorough tour of my scrap space. I hope you enjoyed this little glimpse of where I create and spend a lot of my free time. I love it down here! :)


Wednesday, January 23, 2013

More December Daily

More December Daily pages to share...


Today marked the first official day of December and Debbie and I spent our day at Hollywood Studios enjoying the different rides and shows.  We also park-hopped over to Epcot to ride the new Test Track with Matthew after he got off work. We got to preview it with other Walt Disney World employees. One word...awesome!!

The details:  Since this was Hollywood Studios, I thought it would be fun to do my photos with a filmstrip feel to them.  I was able to do this so easily using Kerri Bradford's Snapshots #2 photo clipping templates. Minimal embellishments on the page make the photos the stars. :)


This was probably my favorite day of our trip...Mickey's Very Merry Christmas Party! The evening was full of magic and special events that made our evening memorable! The fireworks were amazing and I loved the parade as well! :)
 
The details: The photos on this page tell the story of  our amazing night and the full page diecut on the opposite page adds holiday charm and a bit of Disney magic to create this page.  The diecut which says "Have yourself a merry little Christmas" is from Kerri Bradford's December Additions digital die-cut kit...there are lots of fun backgrounds with this kit. You can see the details here.
 
 
Another fun day at Disney..this was our last day at the parks and we spent most of our day at the Animal Kingdom.  Highlights included our 3rd and 4th rides on Expedition Everest (I am hooked!), Mickey's Jingle Jungle parade, lots of animal sightings on safari, and our favorite meal of the trip at the Yak & Yeti in Asia. Yummy food!
 
The details:  When I did the page earlier with the presents on it, I thought it would be fun to do one large present with the day's page title on it.  So I used the same die-cut as earlier and sized my title to fit the present.  The title is from Kerri's kit "December Twenty-Five"...love the variety of words in here! I also ended up adding the journaling around the outside of the page since my diecuts took up the whole page. 
 
 
On my first day home, I headed up Parkview North and the NIC-U to see my new nephew Conor. He is so cute and I snapped a few pictures of him. This was my favorite one of the day. :)
 
The details: A large snowflake diecut page takes center stage on this layout. Its from the same kit that the "Have Yourself a Merry Little Christmas" from December 2nd came from. This was probably my favorite of the group and I used it on several pages.  I also pulled out my baby stamps from Ali Edwards to create the fun title block and snowflake accent block.
 
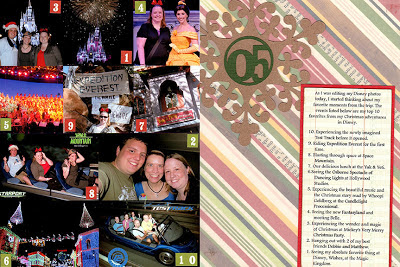
As I started to edit my photos from vacation, I started thinking about all of my favorite moments of our trip to Disney at Christmas.  So I decided to scrapbook my top 10 favorites from the trip here and now.
 
The details: The striped paper is probably my favorite paper that I used in my album but here it proved to be a bit too bright and competed with my photos. So to tone it down, I added a piece of vellum over the top of it.  This really let my photos shine. :)  To correspond with the top 10 list, I added number stickers to each photo that went with each memory. Love the simplicity of this page!
 
 
On this day, I caught what my friend Debbie and I later dubbed the Plague.  I have not been that sick in a very long time...I missed work this day and the following 2 days as well and spent most of this day in bed.  So to remember this, I took a picture of what got me through those days...the meds. :)
 
The details: The overall design of the page is pretty simple and I was able to use a stamp from Ali Edwards (ups and downs) that fit perfectly with the theme of my page.  The journaling block is also a stamp from Ali Edwards...love her stamps and how simple they make putting pages like these together.
 
 
Since I was down and out for 3 days, I watched a lot of movies and tv shows.  I got caught up on all the stuff I missed while on vacation and also watched  a ton of other stuff.  This page documents some of the things I watched while I was sick.
 
The details: A pretty simple page but with a big impact.  The photos were all taken from the internet using Google Images.  I found the largest sized resolutions for each photo and saved them to my computer. I then created the collage using another one of Kerri Bradford's templates.  So easy to do...
 
 
Once I started feeling good enough to get off the couch, I worked on my Christmas cards. I hand-colored the manger scene with my Copic markers for about 30 cards and also stamped, embossed and die-cut enough stockings for another 30 cards.  It definately kept me busy but I ended up loving how both of the cards came out.
 
The details: This was a fun page to put together.  I hand-colored the wreath and the phrase "celebrate the season" with my copic markers and used some fun die-cuts and stamps to create this page.
 
 
One of the cool things that our local hospital does is that it puts up each new baby's name and birth stats on a billboard.  It rotates with each baby's name and its a fun thing to add to the baby book and it was great for my album too. :)
 
The details:  This was another fairly simple page.  I used the diecut snowflake background page again and also added a print and cut from my Silhouette that coordinated with the Echo Park This and That Christmas collection. 
 
 
One of our family's traditions is my dad making his stollen bread.  I took this picture of him baking his bread and added the recipe handed down to my dad from his dad. 
 
The details: The red die-cut on the right is from the Silhouette online store...I just love the clean graphic look of this page.  Minimal embellishments and a picture of the finished bread finishes off this page. 
 
I will be back to share more of my album soon.  Now I am off to snuggle with my sweet nephew. :)


Friday, January 11, 2013

December Daily Catch Up

Wow it is so hard to believe that I haven't blogged on here since November.  So many things have happened in the past 6 or so weeks including a recent trip to Disney, my nephew being born, Christmas has come and gone, and we rang in 2013. A new year and new possibilities ahead...

But I promised that I would share more of my December Daily album, so that is the first thing I want to do.  :)

 
One of our holiday traditions is visiting the Festival of Trees in Downtown Fort Wayne.  I just love seeing all the beautiful trees and practicing my photography skills.  This year we also went to the Botanical Conservatory where they had decorated and themed it to the story of the Grinch.  It was a fun afternoon and I enjoyed every minute of it. :)
 
The Details: The page on the left was created with a die-cut from the very talented Kerri Bradford using this kit from her digital store.  I used several of these pages throughout my album and it made for fun and interesting pages. The photo templates were from Ali Edwards over at Designer Digitals. So much fun stuff to use with your Silhouette too! :) 

 
One of my all time favorite traditions at Christmas is decorating our Christmas tree. We turn on Christmas music and pull out all of our favorite decorations from over the years. There are so many memories attached to these: the first Christmas that we had Bailey, memories of trips to Frankenmuth, Disney, and other places, and some of our collections of ornaments like Mom's rocking horses and my Snowball and Tuxedo collection. :)
 
The Details: The title was diecut from a design I found on the Silhouette store and cut with my Cameo.  The ornaments were all stamped with various Hero Arts stamps and colored with Copic Markers.  They were pop dotted on the page and hung with embroidery floss. :)


An ordinary December day....a new haircut and packing for my Disney trip. :)

The Details: I used another background diecut from Kerri Bradford and the date diecuts are from her as well. An EK Success border punch and some elements from the Echo Park This and That: Christmas collection finishes this page.


The first day of my Christmas Disney trip with my good friend Debbie to visit my friend Matthew who works at Epcot in Mission: Space. :)
 
The Details: The photo collage and large snowflake diecut are both from Kerri Bradford.  Her photo clipping masks are so easy to use and I am now addicted to them. I just totally love how many photos I can fit on a page. :)


This was our first full day spent in Disney. Debbie, Matthew and I spent our day in the Magic Kingdom, celebrating the magic of Disney.  This is also the day that  my sister gave birth to my beautiful nephew, Conor, by C-section 3 weeks early. So my friends and I celebrated my becoming an aunt as well! :)
 
The Details: A fairly basic page with lots and lots of photos on it.  All photo collages are from Kerri Bradford Designs.  I also stamped a few Ali Edwards phrases on my photos using white Staz-On ink.


Another amazing day at Disney.  We spent most of our day at the Magic Kingdom again but headed over to Hollywood Studios to see the Osborne Spectacle of Dancing Lights. One word...AMAZING! Hundreds of thousands of Christmas lights blinking and dancing to the music. This was one of my favorite parts of the trip...amazing! :)

The Details: Another large snowflake from Kerri Bradford as well as some awesome stamping and embossing to create this cheery page.


One of my favorite holiday events at Disney - the Candlelight Processional and Illuminations in Epcot. Add to that delicious food in Mexico and Japan and it was an amazing day! :)

The Details:  This page came together when I found the "Joy to the World" die-cut phrase on my Silhouette Cameo.  I added the 'International Skyline' stamp from Hero Arts along the top of the page with some black embossing powder to make it pop. I then embellished the bottom of the page with a border sticker from Echo Park and the date with some Kerri Bradford die-cuts to create my page.

Well I will be back with more pages hopefully tomorrow. Until then, enjoy!