Sunday, March 14, 2021

Catching Up...

Hello my dear blog readers,

This little blog has been much neglected in the past year. Rest assured, I am still scrapping, but my time this year has been super-limited, so I have not been posting on here at all.

In August, I accepted a new job teaching Kindergarten in-person in my school district. I absolutely love it but it eats up most of my time in the evenings and weekends. Between planning, creating anchor charts, and loads of laminating, my time gets eaten up and I usually only have a few hours to scrap a week! 

So I have been using my time to create. You can find my pages over on the Disney Scrappers Ning site or on my instagram: godschild9494. 

But I am making it my goal to at least try to come here once a month and share my scrappy happenings with you all. 

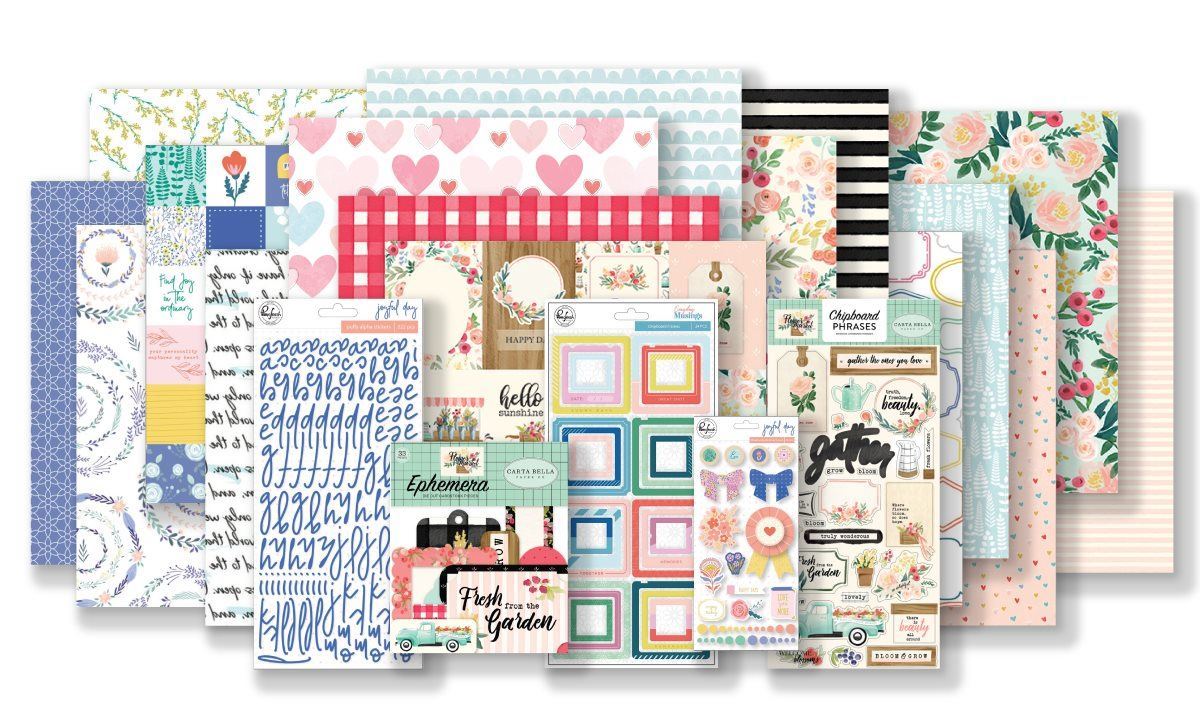
I am currently in the middle of stashbusting an older Hip Kit Club kit with lots of Pinkfresh Studios' "My Favorite Story". I am working on layout number 11 and I will still have stuff left over to make at least 1 more page. It's crazy!

Here's the main kit and embellishment kit. I added in about 4 papers from my stash but this is mainly what I've been using:


So I'll share the layouts I have created so far. 

Weekend Getaway
This layout was inspired by a layout I saw on Pinterest using the "My Favorite Story" collection. I loved the different colored circles and it was a great way to use the circle chipboard pieces that came in the kit. I used my 1 inch circle punch to punch out the pieces and lined them all up. I also love how the white letters pop on the rainbow paper. 


Love You More
I scraplifted this beautiful layout from Niki Rowland, who is one of the design team members for Hip Kit Club. I loved her layout and thought it would be perfect for this sweet pic of my grandma and I. The stripes in the background were created with white acryllic paint and my stash of Lindy's powders that I painted the same width as the striped paper that I cut out the heart die cut from. I then layered on lots of elements from the kit to create this fun and dimensional layout. 


Ark Encounter
I created this layout by scraplifting the very talented Missy Whidden. I have grown to love her layouts and she has introduced me to the world of mixed media. I love the fun and colorful touches that painting on my layouts brings. I fussy cut the rainbow paper from the "My Favorite Story" collection and rearranged the rainbows on this blue paper I painted to create my rainbows. The puffy clouds create a great place to put my photos and also to add a subtle title. These photos are from the Ark Encounter in Kentucky. It is a wonderful place to visit and they built Noah's Ark to the specifications in the Bible. It is filled with all sorts of information about Noah, the flood, and how God's promises are always true.:)


90 Years Young
This sweet layout celebrates my grandma's 90th birthday. I quickly ran out of the flowers in the kit but I turned to my stash of flower stamps and Distress Oxide inks to create these beautiful flowers. I also splattered some ink and tore the right side of the page to bring more of the black striped paper over to that side.


Sweet Friendship
I created this layout about this sweet friend and coworker had several years ago. She and I went through a lot together in the 2 years we taught and we grew close.  


Walt and Me
This was actually the first page I created with this kit. I just loved all the blue elements paired with this photo of my mom and I with a statue of Walt and Mickey in Disney's California Adventure. So I chose many different papers from the kit. 


Sunny & Bright
These pictures are of my sweet friend and I having breakfast at my favorite place on a difficult day. I just loved the bright sunny colors in this collection to go with these photos.


Bubble Fun
This quick and fun layout showcases some photos of me blowing bubbles for my nephew. He loved it and I just had to document the fun we were having. I used a border punch on the striped paper to make bubble layers and it made for a bright, fun layout.


Lucky in Love
This kit also included a few pieces from the Pink Paislee "Lucky Us" collection so I couldn't help but scrap this photo of my boyfriend and I early in our dating days. I dug into my stash and added the giant LOVE letters and a few other pieces from the "Lucky Us" collection to complete the layout. 


One layout I made is still drying because I just finished it today and I am currently working on the other one. I'll be back to share them later!

Hope you are all staying safe out there and happy scrapping!

Janeen

Monday, May 18, 2020

My Scrap Space...Updated!

Hey all! I was looking around on here and realized I haven't shared any pics of my scrappy space since 2013. Lots of changes have happened in 7 years and I thought I would share it with you.


Ok I realize there's a lot going on in this picture so let me take you through each part of my room. The descriptions will be underneath the photos. I have also included links to products that are still available so if anything is in bold, there is a link to the product. :)

This is "the wall", where I keep most of my scrappy supplies. They are a closet organization system from ClosetMaid and are perfect for 12x12 paper storage.
My dad helped me customize the middle section so I could have these pull out shelves for my Paper Sticker binders. I have 4 of these (the 4th is on a bookcase off to the side) that store all my holiday and seasonal embellishments in these divided sleeves. 


My papers are all stored in these Cropper Hopper paper holders and are organized with these labels I got online. I had to trim them down a bit but I love them because I can slip the labels in and out as my storage changes. My patterned papers are stored by manufacturer (see above), theme (holidays, travel, baby, etc), or by color. I also have a few that are miscellaneous patterned papers that don't fit into any of the other genres. My cardstock is all Bazzill and full sized papers and scraps are stored together in Cropper Hopper paper sleeves. I got mine a long time ago and they had extra pockets in them for scraps but these work too.  

My inks, thickers, washi, brads, ribbon, die cutting, painting, and other miscellaneous supplies are stored on the shelves above the paper on the wall.


These shelves hold my die cutting materials in clear plastic boxes as well as my flower storage in a plastic basket. The boxes on the right hold my ribbon and 3D embellishment storage (metal embellishments, plastic letters, etc.) Below is one of the boxes holding some of my ribbons on plastic floss bobbins from the craft store.


These boxes are actually bait tackle boxes I bought almost 20 years ago at Walmart. Here is something similar you could use. Most of the dividers are removable so you can make the compartments as big or little as you like. I use a smaller version of this for my brad and eyelet storage.

The lids lock so there is no way you can spill this unless you knock it over when its open. I've done that and it is not fun!


This next shelf holds lots of different stuff. The top shelf holds idea books and my memorabilia for pages stored int those same Cropper Hopper Sleeves. I have one for each year and one for each trip I've taken that I haven't scrapped yet. 
The next shelf down holds these neat drawer units from Cropper Hopper. They aren't available anymore. I know because I want more of them. They are stackable and hold  4x6 photo holders that I used to store tons of stuff. The ones I have are hard to find but you can use these Iris 4x6 photo holders  just as well. I keep chipboard, gems, journaling cards, and so much more in them. They are the perfect size. 
The bottom shelf holds more of those 4x6 photo holders with all of my Simple Stories project life card and embellishments as well as my brad and eyelet storage boxes from above.


The next set of shelves holds my stamping supplies and other supplies. The top shelf holds my extra page protectors, buttons in jars, chipboard sheets, my Minc and supplies and also my "backstock" boxes. I have tons of extra adhesive up here as well as pens, embossing powders, and other miscellaneous stuff I got from when the Archivers I was working at closed. They gave us bags of stuff and multiples of many things. I didn't want to throw it away so it's up there, waiting to be used.


The next shelf down holds my Stampin Up inks on spinners. Next to that in the purple drawers is my embossing powders and supplies. The white basket holds twine and the clear boxes in front of the purple drawers holds my ink daubers. The boxes are from Scrapbook.com. Each color has a box and my daubers are labeled with my label machine for the color they go with. I am slowly adding new daubers to the boxes as I need them. :)


The shelf on the bottom holds the rest of my inks in Sterilite drawers. The drawers to the far right hold my washi tape and twine. I created my own dividers out of cardboard and glue dots so that my washi would not be a mess. But I am completely out of room...


This section of the wall holds my Thickers alphabet stickers, my flat alphabet stickers my paints and mists, my reinkers, and my 6x6 paper pads. For the Thickers I use these boxes from Sterilite that I found at Walmart. The 6x6 paper pads are in these bins from iDesign. These are great bins that I have found at Meijer, Target, and the Container Store that I used to store lots of stuff.


Next up is my stamp storage. These are the 10x5x6 bins from iDesign. I keep each stamp sent in a pocket. I use these sleeves from Office Depot. I simply cut them in half, making sure to stay on the seam and flip them backwards. I also add a 5x7 piece of cardstock behind the stamp set for visability and durability. I just redid this area of my scraproom last weekend so its not fully finished and is still a work in progress.

This is my computer desk. It is normally not this clean...ha ha. This is where I edit and print my photos, use my Silhouette machine, and get online. The basket to the left has oversized stamps and a bunch of miscellaneous stuff in it. The files on the left hold my photo paper, labels, and other office type supplies. I keep recently completed pages up above my desk on this frame holder until I get them scanned and put away.

This is my scrap desk. It is a giant executive desk that we got for free when my dad's company remodeled their offices years ago. There is actually another one in front of me that my mom uses for her cardmaking. On the top I store my white, black, and kraft cardstock. My Hip Kit Club kits are in the labeled folders in front of me. (They are not available anymore.) This helps me reach for those and try to use them first before I go to my stash. :) 

Next to that is my marker caddy from Stamp n' Storage and next to that are my most used supplies, glue, scissors, rulers, stamp cleaner, journaling cards and some of my favorite tools. I also have a basket that holds a bunch of miscellaneous embellishments that are not themed like tags, word and phrase stickers, labels, and basic shapes. I also store my enamel dots and pop dots here. 
Inside the desk stores all my other most used supplies.
This drawer is home to my adhesives, glue dots, Xyron X, and Nuvo drops. The baskets are from Walmart.

This drawer has my Distress ink foams and blending tools, extra ink daubers, Distress Crackle paints and Distress Stains, and my alcohol inks. Various baskets from Walmart.

This drawer houses my glitter stash. :) More baskets from Walmart.
This drawer houses my most used punches: circles and Disney. It also has my corner rounders and my swatch books. The two brightly colored ones are samples of every color of Bazzill cardstock I own. It makes it so much easier to match up cardstock to my projects.  The other two are my Lindy's Magicals and ink swatch books. I use the Simon Says Stamp ink swatches for my inks. 

This is my extra table that houses a bunch of my workstations. I have my Big Shot here as well some of my most used metal dies in my box from Stamp N Storage. I have the medium size with magnet cards. My large paper trimmer I use for photos and my sewing machine are also on this table. The spinner is from Clip-It-Up and holds all of my company specific embellishments that aren't specifically themed. Echo Park, My Mind's Eye, Pink Paislee, October Afternoon, etc....its all here. You can also see my much neglected Cricut in the background.

Last up is my album storage...you can see that I have albums stored everywhere in my room...at last count I have over 75 completed albums. I am out of places to store them. This is an antique bookcase my parents have that I also have my teaching books in right now. 
I have been amassing this collection for close to 2o years and after spending lots of time working in scrapbook stores, I have quite the amount of stuff. I definitely didn't have near this much when I started out. But if you see anything that interests you that I didn't talk about, please let me know and I can share more. :)

Monday, March 16, 2020

In the news...

Ok world, In the midst of the events unfolding over the past week, I decided I want to share my thoughts and record my emotions about the Coronavirus (Covid-19). This tiny little virus has wreaked havoc on my daily life, closing both my school and church as well as cancelling any social events I had planned over the next several weeks. Even my favorite place on Earth has closed, Walt Disney World, for the remainder of the month.

Today, only staff appeared at my school and we were all frantically trying to wrap our heads around being out of school for 4 weeks or more(!) and creating "remote learning" lessons to keep our kids academically engaged while they are at home. It was almost surreal to walk out of my building with everything I will need to teach reading to my kiddos for at least a month. I am going to miss these young people that I get to interact with every day and that bring smiles and joy to my life. And my co-workers, my confidants, my cohorts, my partners in education...to not see them for several weeks seems not possible...like its a big joke and we will all be back next week, saying 'gotcha'. But sadly this is our new reality.

I ventured out to the stores this weekend with Aaron to stock up on a few extras that Mom didn't pick up. She's in charge of the major shopping and I usually add a few of my own things when I get to the store. But at Walmart, what we found were bare shelves....so many things were out, from toilet paper and cleaning supplies, to bread, cheese, pasta, butter, eggs, and even frozen pizzas. I did find a few boxes of elbow macaroni on an endcap and I stocked up on my Pepsi so I am good there for several weeks. :) Plus some miscellaneous snacks and cheese. Definitely one of my weirder shopping trips for sure.

As we face uncertainty, however I know that everything is going to work out ok in the end. It may not be as easy or as neat as I want it to be. It will probably be tough and messy but that's okay because I know my God has this.

Matthew 6:25-27  “Therefore I tell you, do not be anxious about your life, what you will eat or what you will drink, nor about your body, what you will put on. Is not life more than food, and the body more than clothing?  Look at the birds of the air: they neither sow nor reap nor gather into barns, and yet your heavenly Father feeds them. Are you not of more value than 
they? And which of you by being anxious can add a single hour to his span of life?”

John 14:27 “Peace I leave with you;my peace I give to you. Not as the world gives do I give to you. Let not your hearts be troubled, neither let them be afraid. “

Philippians 4:6-7  do not be anxious about anything, but in everything by prayer and supplication with thanksgiving let your requests be made known to God. And the peace of God, which surpasses all understanding, will guard your hearts and your minds in Christ Jesus.

Psalm 56:3 When I am afraid, I put my trust in you.

Proverbs 3:5-6   Trust in the LORD with all your heart, and do not lean on your own understanding.In all your ways acknowledge him, and he will make straight your paths.

Joshua 1:9   Have I not commanded you? Be strong and courageous. Do not be frightened and do not be dismayed, for the Lord your God is with you wherever you go.

Sunday, September 22, 2019

Stash-busting with Hip Kit Club

Hello there everyone! Today I have a new blog post about how much I love the Hip Kit Club kits. If you haven't heard of them, you can head over to their blog https://www.hipkitclub.net/ and check out all the goodness! Each month, the amazing people at Hip Kit pull together gorgeous products from several manufacturers and I get the main kit and embellishment kit delivered straight to my door. They also have several other coordinating kits but I find that these two are more than enough for my needs.

When I get my kit each month, I store it in a Cropper Hopper sleeve and these beautiful kits sit on my desk waiting for me to pull them out and create! One of the reasons I love these kits so much is that all the papers and embellishments are perfectly coordinated for me and they usually work for a variety of layouts. But now I have several of these kits and not enough sleeves to store them. So each month I have been working on "stash-busting" a kit to use it up and make way for my new kit.

This month, I stash-busted my February 2019 kit. Here is a look at the gorgeousness that I had to play with.

The main kit


The embellishment kit


With this gorgeous kit, I was able to get 8 layouts, plus I had 2 papers and several embellishments left over that I moved into my stash.

Here are the layouts I created:


I was able to use this kit to scrapbook several different themes and photos: Disney, Mother's Day, birthdays, Valentine's Day and a few everyday layouts as well. I did pull in a few things from my stash where needed but overall I loved the pages I was able to make with this kit. 

I'll be back soon with another Hip Kit Stash-busting post soon!


DisneyScrappers September Sketch


Hello there scrappy friends and happy Sunday! I am popping in today with my layout for this month's sketch challenge over at DisneyScrappers. I just love Susan's sketches and they are so versatile and easy to use! You can check out the sketch here!


For my layout, I followed the sketch pretty closely. I love the Mickey globe cut file for Epcot and I  found these photos of the entrance at Epcot at the end of the night. With this area changing, I wanted to make sure I documented my favorite parts of this area including the fountain and the lights in the sidewalk.

Once I found my photos, I paired them with this older collection from Basic Grey called "Second City" I just love the funky mix of orange, yellow, purple, and teal and the colors were perfect for my photos. I also added in some silver accents. For the stars, I found these wood veneer shapes in my stash and used my silver Stickles from Ranger to cover them. I put everything on a black background to make it all pop and added some Thickers and silver glitter alphabet stickers from my stash.

If you love scrapping Disney or you just love sketches, come on over to DisneyScrappers and check out the challenge!

Also in October, DisneyScrappers is having a "Sketchtober" crop which should be a lot of fun! A few of the pre-crop challenges are already up so come check it out!

Saturday, August 24, 2019

Another DisneyScrappers Sketch Challenge

Wow its been extremely busy around here this month! I headed back to school about 3 weeks ago and that has slowed down my scrapbooking considerably. But I was able to create this fun layout for the August sketch challenge over at DisneyScrappers. You can view the details and everyone else's pages here: http://disneyscrappers.ning.com/forum/topics/2019-august-sketch-challenge

Once I saw the big Mickey circular design, I knew I wanted to scrap my pictures from Mickey's Fun Wheel in California Adventure from my trip in 2015. There is also a stashbusting crop going on over at DisneyScrappers and I was inspired to pull out this really old collection called "Sweet Summertime" from Little Yellow Bicycle. I loved the fun bright colored paired with my photos. I also mixed and matched 3 different sets of Thickers on my layout to create the title. I just love how bright and fun this layout is!


Wednesday, August 1, 2018

Out of this World

Hello blog readers! I wanted to pop by and share my latest creation for Disney Scrappers. This month's sketch was a super fun one with circles and stars and room for 2 photos. You can check out the sketch here: http://disneyscrappers.ning.com/forum/topics/2018-august-sketch-challenge

I loved the feel to the sketch and it made me think of my Buzz Lightyear Space Ranger Spin photos. I had tons of them though so I converted the sketch to 2 pages by extending several of the patterned papers and adding a third circle to the other side.


Susan also had some really fun cut files for us to use and so I was able to incorporate the little alien and planet die cuts. I also created my own space ranger logo die cut that I created using the Silhouette Trace feature. To go with the galactic feel of this layout, I watercolored behind each of the die cuts to match my papers, which are all from an older BoBunny line called "Sunkissed".


I turned to my Thickers stash to create this fun title. The silver ones I just picked up and I love the space feel they have...I can see them making their way onto lots of Tomorrowland pages.


I just love the way this layout turned out. The fun bright papers complement my bright photos and I just love the colorful die cuts!