Tonight is Christmas Eve. The eve of the birth of Jesus, who is my Lord and Savior. The true meaning and reason behind our Christmas celebrations. One of my family's Christmas traditions has always included going to church on Christmas eve to celebrate Christ's birth and remember what makes this holiday so very special. We have always gone to a Catholic service because my whole family is Catholic. Even when I decided to change churches, I still always went to Christmas eve mass with my family. I love the traditional Christmas carols as well as the presentation of the gospel story of Christ's birth.
This year, however, I decided that I wanted to attend Christmas eve services at my church, Pathway. I wanted to be able to celebrate this joyous day with my friends and fellow believers at this wonderful place where I feel loved and accepted. So I changed my Christmas eve tradition and headed over to Pathway to celebrate this holiday. I am so glad I did because everyone over there did a fabulous job helping to portray the true meaning of Christmas and celebrating Christ's birth and what Emmanuel truly means, which is God with us. I was blown away with the music and it touched my heart in the most profound way. Pastor Ron did a great job relating the birth story and spoke to my heart about not being afraid and trusting in God. It was a amazing to see so many different people all worshipping and thanking God...it uplifted me and helped me refocus on the true meaning of the season.
Now I couldn't not go to church with my family, so after I got home we headed out to Saint Charles, a Cathloic church with my family, Grandma, aunt, uncle, and cousins. I loved seeing the church so beautifully decorated with the nativity scene and singing the traditional Christmas carols. I also thought the priest did a very good job with the Christmas story. I really liked his point that Jesus came to bring us joy, but that sin robs us of that joy. We must confess our sins to restore the joy within our souls and our relationship with our savior.
One thing I really loved about going to both services was just how different they both were but yet how I could meet my Savior in both places and my joy was renewed and strengthened through both experiences. I also loved the similarities between the two services, such as the Christmas story and the music that was played. It reminds me just how blessed I am to have both friends and family that believe as I do. :)
"Do not be afraid. I bring you good news of great joy that will be for all the people. Today in the town of David a Savior has been born to you, he is Christ the Lord." Luke 2:10-11 Glory to God in the Highest!

Friday, December 25, 2009
Saturday, December 19, 2009
I know its a little out of season...
...but I never posted the layout I made with my fave pics from my fall photo shoot with Rebekeh. The layout turned out so cool and I just had to share it with everyone! :)

I completed this for one of the design team challenges a few months ago over at http://ifitsgroovy.blogspot.com/. We were challenged to create a layout with a photo cut into pieces. I knew I wanted to scrap these gorgeous pictures from that glorious autumn day and so I came up with the catch title and decided to truly make a mosaic of my largest photo as well as the photo of the leaf using some of Tim Holtz' Fragments. They were perfect for this project and gave me the exact look I wanted. I also used patterned papers from SEI's Windsor line as well as gold letters and leaf accents from Making Memories to really help this page come together. I totally love it and this layout inspired the mini book that I posted a few weeks ago. :)
Wednesday, December 16, 2009
Creativity Central
Well it is Wednesday and halfway through the week. I have been busily working on many different creative projects, including my Christmas cards....I will post later once I have sent them all out, as well as various layouts of both holiday events and some older photos as well.

This layout is made mostly with pieces from the new December Scarlet Lime kit...I just loved the Christmas-y feel of these papers and they perfectly complemented my photos from the Holiday Pops concert we went to this past weekend. I especially loved all the music note touches such as the large paper flower and the green sheet music paper I added to the kit from my own stash. I also incorporated memorabilia onto the page by attaching my ticket as well as a sheet from the program. :) These pieces really help tell the story of this fun and festive event.

These pictures are from a vacation my family took to the lake 2 years ago. One day we decided to head to the flea market in nearby Shipshewana. I loved these vintage-y papers from Basic Grey and raided my metal stash to give the page a nostalgic look. :)
I hope you are all enjoying your holidays and spending time with your family and friends, celebrating the true meaning of the season...JESUS!
Monday, December 7, 2009
Now layouts to share! :)
Just popping in with a few of my latest layouts that I have been busy creating these past few weeks. Enjoy!


This is one of my absolute favorite photos of my parents. I surprised them on their 30th wedding anniversary with a photo shoot and dinner out on me. :) This is my favorite shot of the group. For the layout I used some beautiful Autumn Leaves patterned papers and added some distressing with Tim Holtz' Distress Inks. I also played with my Cricut to create the title and flourishes.

This is another layout I created with photos from the photo shoot with my mom and dad. I totally love the one on the bottom left where my dad is being silly and my mom is smiling away for the camera...it just captures their personalities so well. :) I lowered the saturation on the photos to give them this washed/vintage look. I used the gorgeous Wisteria line from Basic Grey to complement my photos and I love that I could use purple on this sweet layout. I also played around with one of my new Hero Arts Stamps...it's called Dots and Flowers...and Perfect Pearls from Ranger to add some texture to the large purple photo mat. I simply stamped on the purple cardstock with Versamark ink and then brushed the Perfect Pearls powder over my stamped image. The pearls stuck to the ink and then I brushed off the excess powder. This technique adds a bit of shine to any project and is one of my new favorite things to do.

This layout is my first one scrapping my adorable puppy Bailey (who is now 2 years old). I absolutely love this photo of my sister and Bailey, but it was very bright and had a lot going on in it. Below is the original.

So to soften the look of the photo up a bit, I changed the photo to a sepia tone to really help focus in on this sweet relationship between these two.
I also had a lot of fun playing with some patterned paper from Crate Paper's Mia collection. The colors and patterns in this line really helped add to the photo and tell my story as well.
Until my next post, happy scrapping and Merry Christmas! :)
Friday, December 4, 2009
A Scrapping Challenge and some timesaving tips
Hello fellow creative friends! I wanted to pass along a challenge to each of you during this crazy busy holiday season. Feel like you don't have time to scrap? Challenge yourself to set a timer for 30 minutes and create a scrapbook page before the timer goes off. It really helps you to step outside of your comfort zone and really focus on your photos and the story you want to tell instead of the product and new techniques. Here's my layout.


To make my project easier, I preprinted my photos and had a design all ready to go. I chose a coordinated line of products that included patterned papers, letters, and embellishments. I then was able to lay out my page and get it finished from start to finish in 30 minutes. I even had time to personalize my layout in a few ways including inking around the letters and adding buttons to the flowers. I saved myself time by leaving my buttons "naked" (I didn't sew them), gluing my letters down flat, and using uncropped 4x6 photos. Why don't you give it a try and share your creations on the If It's Groovy blog (see the information below).
******************************************************
Time for If It's Groovy challenge over at http://ifitsgroovy.blogspot.com/ to start for this month! Ready? Your lo is due by December 30th 11pm EST. Don't delay and forget to turn in your layout :) The challenge is to set a clock, or write down the time you are starting and creat a layout in 30 minutes or less! It really can be done. We all need more time this month with the holidays, parties, dinners, etc...but we *have* to scrap. Try it this way and be sure to enter by emailing me at groovydeb@yahoo.com with your layout or point me in the direction to your online gallery. Be sure to check back on the blog to see the winner's name and if your name is selected email mailing info within the month to claim your prize. Good luck!
Wednesday, November 11, 2009
Crepe Paper Flowers Tutorial
A few months ago, I ran across a fun little do it yourself project in one of my favorite scrapbooking magazines, Creating Keepsakes. It was a tutorial for making your own flowers. So I bought the materials and this week I gave it a shot on one of my latest scrappy projects.
You can see the flowers featured here on my "Lakeside Rose Garden" layout.

They are super easy and fun to make! Here's the steps...
You will need: crepe paper or tissue paper, your favorite color of glimmer mist, a button, needle and thread, and paper towels.
1. Cut 6 circles out of tissue or crepe paper, 3 circles in each of 2 sizes. I used crepe paper on mine which gave it a different texture. I also hand-cut my circles out at 2" and 2 1/2".

2. Crumple each circle up and then flatten it to add more texture and depth.

3. Add a button in the middle and sew the layers together using white thread.


4. Lay your flower onto the paper towels and cover liberally with glimmer mist. (I used Tattered Angels' Glimmer Mist in Bubblegum Pink.) Make sure you lift the petals and get the color between each layer. You can add just a light layer of mist to get a pastel colored flower or a lot of mist to get a more intense colored flower. Let dry.


5. Once the flower is dry, you can trim the circles to get a more circular look like I did or you can leave the flower as is. Attach to your layout using glue dots and fluff the petals to give volume and shape.

6. Enjoy your completed project. I created this card using one of my flowers to give it a feminine touch.

As a bonus, I want to show you how to add color to your white fabric Thickers. They come in 3 different styles and they are great for adding your own color to. I colored the letters "Lakeside" in my layout at the top of this post and the turquoise brackets in the card above.
You will need: white fabric Thickers, glimmer mist, excess sticker backing from your glue dot roll or xyron machine or waxed paper, paper towels
1. Choose the letters you want to use and place them onto the sticker backing sheet or waxed paper. (This is so that you can get them off and place them on your project once they are dry.)

2. Place your letters on the sheet from step one onto a piece of paper towels and cover liberally with glimmer mist. (I used Tattered Angels' Glimmer Mist in Turquoise Blue.)

3. Blot off excess mist with a paper towel. I found it really helpful to get as much of the mist off of the backing sheet as possible to keep my hands clean. Repeat if needed to darken the color. Let dry.

4. Attach to your project to add your own personalized color. :)
Tuesday, November 10, 2009
Can It Really Be November Already?
Wow, this fall is flying by at record speed. The last few weeks have been especially busy around here with Halloween, my friend Bek's birthday, and my birthday all bunched right together. And between those events, working, and creative time the past few weeks have whooshed past me.
My birthday was a great time and I really enjoyed hanging out with my family and friends. My parents even got me a new Vera Bradley purse to add to my collection. It's the Bowler bag, which I have decided is my perfect purse....just enough room for everything I need and a place for everything and everything in it's place. It's one of those things in my life that make me happy! :)

Sorry for the huge margins...I have no idea how to get rid of them. Anyways, this is the new Carnaby pattern...it is gorgeous! Love the pinks, oranges, and browns in here. :)
I also have been busily working on a mini book for my friend Rebekeh's birthday that was a few weeks ago. I normally don't make a lot of mini books but after we took all those beautiful pictures a few weeks ago and I found the perfect patterned paper from SEI to match, I knew that this would be one birthday present that would knock her socks off...and it did! :)


My birthday was a great time and I really enjoyed hanging out with my family and friends. My parents even got me a new Vera Bradley purse to add to my collection. It's the Bowler bag, which I have decided is my perfect purse....just enough room for everything I need and a place for everything and everything in it's place. It's one of those things in my life that make me happy! :)

I also have been busily working on a mini book for my friend Rebekeh's birthday that was a few weeks ago. I normally don't make a lot of mini books but after we took all those beautiful pictures a few weeks ago and I found the perfect patterned paper from SEI to match, I knew that this would be one birthday present that would knock her socks off...and it did! :)


I used one of the BoBunny cascading albums to complete this project. It was a great canvas to work on and just the right amount of space to add my photos and accents. The patterned papers are all from SEI's "Windsor" line and the combo of yellows, browns, purples, and gold perfectly coordinated with my photos. I also found a ton of great leaf embellishments and used a gold leafing pen on the edges of each page...love the elegant touch it added!

This is a layout I created a few weeks ago about my mom and her love of gardening. I am always taking pictures of her beautiful blooms and I wanted to have a layout in my albums that showed who the true gardener was behind the gorgeous flower photos. It is titled "A Gardener Lives Here" and the journaling reads,
"No it's not me. I have one of those black thumbs when it comes to plants. The true gardener in our family is my mom. Her flowers are always gorgeous and she always has some exotic plant or another around the house. She can take a plant that is dying and nurse it back to health. There was this one plnat that was just a nub of a stem and by the end of the summer Mom had transformed it into a gorgeous blooming plant full of big pink flowers. So please don't give me the credit. I only take the pictures of these gorgeous blooms. It is Mom who truly has the green thumb in our house."
I had a blast creating this little garden at the top of my page with various Prima flowers and some green paper frills from Doodlebug.

These are pictures of my friends and I hanging out on a tank at a local park. I especially like the up close picture of the gears....the colors and contrast of the photo is just really cool! I haven't decided if I am going to add journaling or not. The chipboard stars and "&" sign I made by heat embossing them first and then going around them with a silver leafing pen. :) I also didn't have a silver letter tag of an "R" so I transformed an "F" into an "R" with my Slickwriter.
Also hooray for using up old Making Memories metal embellishments. :)

This is one of my favorite photos of my dog Rusty. It was one of the last photos we took of him before we got our second dog. The journaling isn't written yet, but it is going to talk about how he pretty much ran the house and how much a part of our lives he was. The title piece is a Jolee's sticker and I found these great papers from Crate Paper to coordinate with it.

I absolutely love this layout for so many reasons. The colors are so bright and bold and they compliment my mom so beautifully for her birthday. :) The papers and embellishments are all from My Mind's Eye and they are so whimsical and fun. It was a super simple page to make and it turned out perfectly!
Friday, October 23, 2009
autumn splendor and a photo shoot
Fall is such a gloriously beautiful season. The days are cooler and shorter. My jeans and sweaters come out of the closet. It is the weather for bonfires, trick-or-treating, pumpkin picking, and many other outdoor events. But my favorite part of this time of year is the world bursting forth with riotous color and leaves twirling down from the heavens.
Today I got to revel in this beautiful aspect of the season with my dear, sweet friend Rebekeh. We headed to a local nature preserve and spent a few hours enjoying the gorgeous scene laid before us, laughing and sharing stories and events, and photographing each other and our beautiful surroundings. These are just a few of our favorite photos from the day. :)


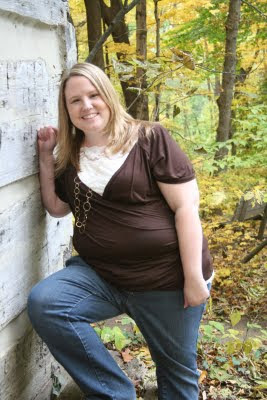


Today I got to revel in this beautiful aspect of the season with my dear, sweet friend Rebekeh. We headed to a local nature preserve and spent a few hours enjoying the gorgeous scene laid before us, laughing and sharing stories and events, and photographing each other and our beautiful surroundings. These are just a few of our favorite photos from the day. :)


Be sure to check back next week. Rebekeh and I have a challenge going on to scrapbook some of these photos before we scrap next week. I will definately be posting some of them soon!
Wednesday, October 14, 2009
Back to Blogging
Again I have let life get in the way of my blogging. This month has been absolutely crazy! Lots of stuff going on and major life events to share....
![]()
![]()
![]()
![]()
![]()
![]()
![]()
- I guess the biggest piece of news is that Renee and Zach got married on October 3rd. The wedding was beautiful and Renee and Zach looked fabulous. I was a bridesmaid and I LOVE the dresses that Renee picked out for us. No pictures back yet but when they do get back I will post a few of my faves. :)
- Last week my Uncle Jerry passed away. It has been an emotional time for our whole family, especially with it being so close to Renee's wedding. He had brain cancer and even though he fought bravely, he lost the battle. We will miss him very much. He was a great husband, father, grandfather, brother, uncle.....our hearts are heavy but he is whole again!!! We will miss you Uncle Jerry....we love you.
- I started my job at Archivers. I am really loving every part of it, especially getting to share my love of this fabulous scrapbooking hobby with others. I am not loving working retail again and I could do without the weekend and evening hours, but this is where my life is taking me at the moment so I will enjoy the present.

This was one of my October projects for the If It's Groovy blog. We were challenged to scraplift a sketch and use autumn photos or products. I was able to find these gorgeous photos of the tree in our front yard in full autumn colors with a gorgeous sunset behind it. The photos were perfect with this new Basic Grey "Indian Summer" line. The felt embellishements are my favorite part...they added just the right touch to my page.

This layout has some of my favorite photos from a local fall festival. I took these photos in 2007 and love the feelings they invoke in my heart. I used my cricut to diecut the cute little apples and added some felt letters and transparency frames to complete the look.

This is a photo I took of my dad in 2007. I scraplifted a page from Kelly Goree and used the new Basic Grey "Junebug" line. The colors lended themselves very nicely to this masculine page and even though I have flowers and ribbons on it, it complements my dad's photo perfectly.
I also took an online sketch class from my good friend Valerie Salmon called Got Sketch Doubles. I found the class totally inspiring and made some really cute pages from it. :)

These photos are from the Harry Potter book 7 release party that was held at our downtown library. They had people dressed as characters, games and events based on the books, and even a Daily Prophet to read as we waited for midnight. The pocket on the left page holds my copy of the Daily Prophet and Maurader's Map. I also used some great patterned papers from SEI and glitter Halloween stickers from Doodlebug to get this fun, yet spooky look!

These are pictures from our Labor Day BBQ in 2007. I got some great shots of the family and I really wanted these photos to take center stage so I put all of my embellishments on the outside edges of the page. I even got to use up some BBQ stickers from Pebbles that I have had for a few years. Gotta love using up supplies!

These are pictures of my friends and I hanging out at a local park. The title and monkeys are a play on words and I love the playful look they give to the layout.

This page showcases photos from my friend Cassie's wedding. I helped her make the programs that are on the page and I also included the invite to the page instead of a larger photo. I really like the way this one turned out and I got to use up some of my KI paper to boot!
Wow, this turned into a super long post and I still have more to share, but I will save that for later. :) Night all!
Subscribe to:
Posts (Atom)