Anyone who knows me knows that I LOVE to be creative. Whether it be scrapbooking, stamping, photography, or other crafty venture, I love to make beautiful things. And the place that I do most of my creating is in my scrap room in our basement. I have taken over the space and today I thought I would share it with you my blog readers. :)
This is what my space looks like...nothing fancy but it is very scrapper friendly. I love to escape down here and immerse myself in my projects.
The pink bins at the bottom here hold all of my punches and fabric supplies.
This is my huge shelving system. Most of my stuff is organized on these shelves. They are from Closet Maid and are perfect for holding 12x12 albums and papers. I did add extra reinforcement to each shelf because the papers and albums can get really heavy really fast.
The following photos detail the shelves and what is on them...going from left to right.
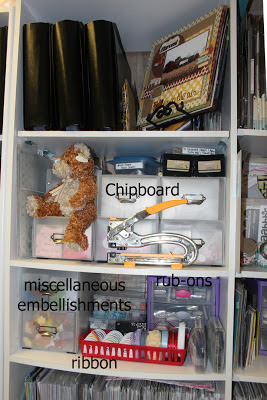
This section of shelves holds lots of embellishments. The top shelf holds my newest albums and this really cool cookbook holder holds some of my most recent pages that need to be put into albums.
The next shelf down is almost all chipboard. The little drawers are from Cropper Hopper and hold their 4x6 photo sleeves that hold so much more than photos. I have tons of them for everything from chipboard and journaling spots to gemstones and tags.
The shelf below that holds more miscellaneous embellishments. The little containers in the middle hold all of my brads and eyelets, and the purple bins on the right hold my rub-ons. The red basket in the front holds my rolled ribbons. Other ribbons are stored on embroidery floss cards in a plastic box on a shelf to the left of these shelves. Below that is all patterned paper.
This is the center part of my shelving unit. The shelves here are longer to accomodate my Paper Sticker Binders (see below). The top shelf holds more chipboard as well as buttons and other miscellaneous embellishments. The bear is a Build-A-Bear Scrapbook Bear that I got a few years ago...love him! (But I heard that they don't make the scrapbooking outfit anymore...)
The next shelf holds my letter stickers in a divided embellishment box from Cropper Hopper, flowers in jars from Making Memories and the purple drawers hold miscellaneous twine and flowers.
Below that is my stamping supplies. The inks and embossing powders are all aranged in these drawers. Love me my inks! :)
All of my paper is organized in these 12x12 paper holders from Cropper Hopper. These babies hold over 200 pieces of paper apiece. I have my paper organized in a few different ways which seems to work for me to be able to find what I am looking for. My patterned paper is organized into holidays (Christmas, Winter, Beach, etc) or by manufacturer (BoBunny, Basic Grey, My Mind's Eye, etc) and I also have a few miscellaneous ones as well. I found these great little labels on clearance at Michaels several years ago and bought out everything the store have...love them!

Cardstock is also organized in these paper holders. I have a pretty meticulous system for organization...its a bit of OCD coming out in me. I only use Bazzill cardstock so I keep a current list of all of their colors in my computer. I then organize my paper based on that list starting with the reds/pinks, and moving through the rainbow order. I store my papers in plastic Cropper Hopper sleeves, 2 colors per sleeve. The full sheets and all scraps of that color are stored here. I also created color rings with a swatch of each Bazzill color so that I can perfectly match my patterned papers to the cardstock I want and then easily find it in my stash. Crazy right? But it works and I love it!

Most of my stickers and flat embellishments are stored in Paper-Sticker Binders from Crop in Style. These binders have 12x12 page inserts. Some are divided to store smaller embellishments . I actually have 4 of these....the other one sits on a small table to the side of my shelves. My goal is to get down to 3 eventually...I hope. The binders are divided into themes such as baby, beach, kids, Christmas, fall, etc... The binders are on pull out shelves so that I can easily pull them out, look through the binder to see what I want and then push it back in out of the way. My dad altered the shelves so that I could have this feature and I love it!

This section of my shelf holds lots of different things. The top shelf holds extra page protectors, page holders and other kits that I have gathered over the years. The album holds unifinished pages that I made at convention classes, etc. The blue bin holds all of my journaling spots and other miscellaneous journaling embellishments. The box above that is the box I use when I use spray adhesive on my diecut shapes.
The next shelf down holds all of my manual die-cutting supplies including all of my Quickutz dies, embossing folders and steel-rule dies. The pink bin holds all of my spray mists and behind that is miscellaneous stuff including my 6x6 pads, some 8x8 paper and other embellishments.
The shelf below that holds all of my Thickers. I have them in 2 Rubbermaid boxes but because I am a Thickers addict, there are more piled on top of the bins that don't fit. Next to those is my decorative strips from Doodlebug and Bazzill. The Doodlebug ones are sorted into silverware containers from Bed Bath and Beyond.
This is my stamp corner. Almost all of my stamps are stored here. All of my clear and cling stamps are stored on this Clip-It-Up Mini with the attached upper section. I put the stamps into these bags from Office Depot, cut in half.
The stamp shelves are from Cropper Hopper and are great for holding wood mounted stamps..I also have 3 more of these on the other side of the spinner.
Below this shelf is miscellaneous storage including idea books, photo supplies, and my Copic markers.
This is my computer desk...pardon the mess. It's kind of a catch all for the miscellaneous stuff in my scraproom. Above my computer is where my Silhouette Cameo is. And on the little shelf next to it is more of my wood block stamps....did I mention that I love stamps?!? My printer is also located here...its an Epson Artisan 837 printer...the print quality is amazing and it is wireless which I love.
And finally, this is my scrap desk. This is where I do all of my creating. It is a giant executive desk that we got free from my Dad's work when they remodeled. There is actually another one behind it that holds my sewing machine, another Clip-It-Up with miscellaneous embellishments on it, markers,and my Cricut.
Back to the desk itself. My trusty scrapbook sketch binder is always on the left. In front of me are all of my Scarlet Lime kits that I haven't yet used up. Right now since I am working on my sister's wedding album and using the same papers throughout, those papers are also stored here. The right side of the desk holds my most used supplies (adhesive, tools, etc).
Inside the desk drawers, hold extra adhesive, alcohol inking and other inking supplies, glitter, paint, circle punches, and other miscellaneous embellishments.
I also have a 6 foot white table that I use for extra space while I am working, or to have friends come over and scrap.
Well there you have it....a thorough tour of my scrap space. I hope you enjoyed this little glimpse of where I create and spend a lot of my free time. I love it down here! :)


